FitzGerald J., Dennis A., Durcikova A. Business Data Communications and Networking
Подождите немного. Документ загружается.

HANDS-ON ACTIVITY 3A 115
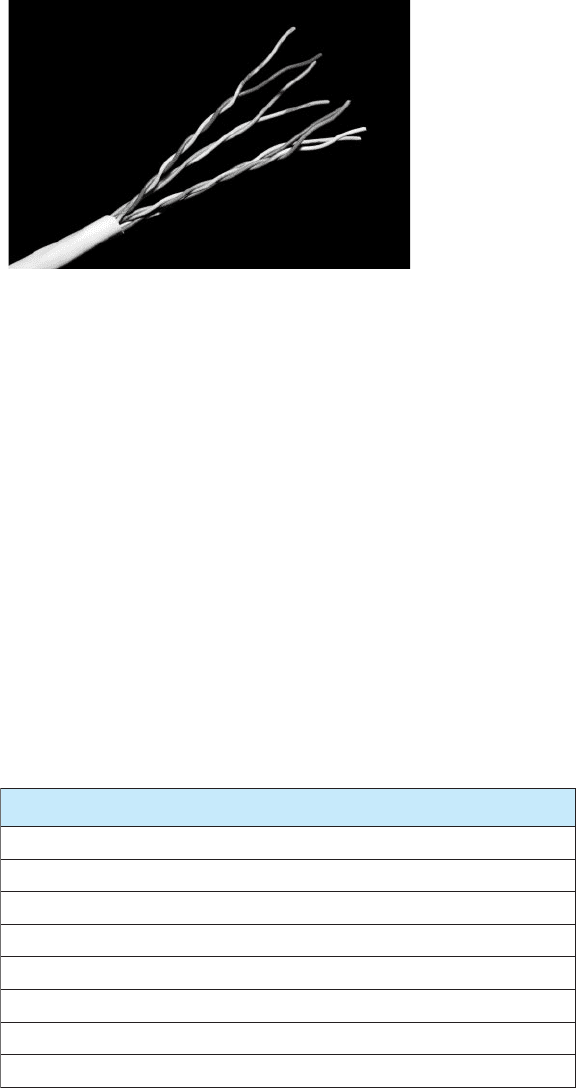
FIGURE 3.28 Inside a Cat 5 cable
Source: © Jason/Alamy
If you have an old Cat 5 cable (or are willing to spend
a few dollars to buy cheap cable), it is simple to take
the connector off. Simply take a pair of scissors and
cut through the cable a few inches from the connector.
Figure 3.28 shows the same Cat 5 cable with the connec-
tor cut off. You can see why twisted pair is called twisted
pair: a single Cat 5 cable contains four separate sets of
twisted pair wires for a total of eight wires.
Unfortunately, this picture is in black and white so
it is hard to see the different colors of the eight wires
inside the cable. Figure 3.29 lists the different colors of
the wires and what they are used for under the EIA/TIA
568B standard (the less common 568A standard uses the
pins in different ways). One pair of wires (connected to
pins 1 and 2) is used to transmit data from your computer
into the network. When your computer transmits, it sends
the same data on both wires; pin 1 (transmit+) transmits
Pin number
1
2
3
4
5
6
7
8
White with orange stripe
Orange with white stripe or solid orange
White with green stripe
Blue with white stripe or solid blue
White with blue stripe
Green with white stripe or solid green
White with brown stripe or solid brown
Brown with white stripe or solid brown
Transmit +
Transmit –
Receive +
Not used
Not used
Receive –
Not used
Not used
Color (EIA/TIA 568B standard) Name
FIGURE 3.29 Pin connection for Cat 5 at the computer end
the data normally and pin 2 (transmit–) transmits the same
data with reversed polarity. This way if an error occurs,
the hardware will likely detect a different signal on the
two cables. For example, if there is a sudden burst of elec-
tricity with a positive polarity (or a negative polarity), it
will change only one of the transmissions from negative
to positive (or vice versa) and leave the other transmission
unchanged. Electrical pulses generate a magnetic field that
has very bad side effects on the other wires. To minimize
this, the two transmit wires are twisted together so that
the other wires in the cable receive both a positive and
a negative polarity magnetic field from the wires twisted
around each other, which cancel each other out.
Figure 3.29 also shows a separate pair of wires for
receiving transmissions from the network (pin 3 (re-
ceive+) and pin 6 (receive–)). These wires work exactly
the same way as transmit+ and transmit− but are used by
the network to send data to your computer. You’ll notice
that they are also twisted together in one pair of wires,
even though they are not side-by-side on the connector.
Figure 3.29 shows the pin functions from the view-
point of your computer. If you think about it, you’ll
quickly realize that the pin functions at the network end of
the cable are reversed; that is, pin 1 is receive+ because it
is the wire that the network uses to receive the transmit+
signal from your computer. Likewise, pin 6 at the network
end is the transmit− wire because it is the wire on which
your computer receives the reversed data signal.
The separate set of wires for transmitting and receiving
means that Cat 5 is designed for full-duplex transmis-
sion. It can send and receive at the same time because
one set of wires is used for sending data and one set for
receiving data. However, Cat 5 is not often used this way.
Most hardware that uses Cat 5 is designed to operate in a

116 CHAPTER 3 PHYSICAL LAYER
half-duplex mode, even though the cable itself is capable
of full duplex.
You’ll also notice that the other four wires in the cable
are not used. Yes, that’s right; they are simply wasted.
Deliverable
Find a Cat 5 or Cat 5e cable and record what color wires
are used for each pin.
HANDS-ON ACTIVITY 3B
Making MP3 Files
MP3 files are good examples of analog to digital conver-
sion. It is simple to take an analog signal—such as your
voice—and convert it into a digital file for transmission
or playback. In this activity, we will show you how to
record your voice and see how different levels of digital
quality affect the sound.
First, you need to download a sound editor and MP3
converter. One very good sound editor is Audacity—and
it’s free. Go to audacity.sourceforge.net and download
and install the audacity software. You will also need the
plug-in called LAME (an MP3 encoder) which is also free
and available at lame.sourceforge.net.
Use Audacity to record music or your voice (you can
use a cheap microphone). Audacity records in very high
quality, but will produce MP3 files in whatever quality
level you choose.
Once you have the file recorded, you can edit the Pref-
erences to change the File Format to use in saving the
MP3 file. Audacity/LAME offers a wide range of quali-
ties. Try recording at least three different quality levels.
For example, for high quality you could use 320 Kbps,
which means the recording uses 320 Kbps of data per
second. In other words the number of samples per sec-
ond times the number of bits per sample produces equals
320 Kbps. For regular quality, you could use 128 Kbps.
For low quality, you could use 16 Kbps.
Create each of these files and listen to them to hear the
differences in quality produced by the quantizing error.
The differences should be most noticeable for music. A
recording at 24 Kbps is often adequate for voice, but
music will require a better quality encoding.
Deliverable
1. Produce three MP3 files of the same music or
voice recording at three different quality levels.
2. List the size of each file.
3. Listen to each file and describe the quality differ-
ences you hear (if any).
HANDS-ON ACTIVITY 3C
Making a Cat 5e Patch Cable
A patch cable is a cable that runs a short distance (usually
less than 10 feet) that connects a device into a wall jack,
a patch panel jack, or a device. If you have a desktop
computer, you’re using a patch cable to connect it into
your Ethernet LAN. Patch cables are relatively inexpen-
sive (usually $10 or less), but compared to the cost of
their materials, they are expensive (the materials usually
cost less than $1). Because it is relatively easy to make a
patch cable, many companies make their own in order to
save money.
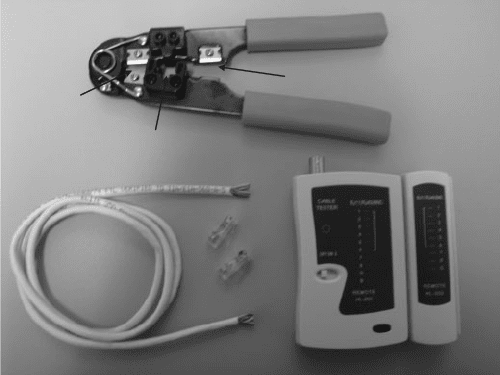
To make your own patch cable, you will need a
crimper, some Cat 5e cable, two RJ45 connectors, and
a cable tester (optional). See Figure 3.30.
1. Using the cutter on the crimping tool, cut a desired
length of Cat5e cable.
2. Insert the end of the cable into the stripper and
gently press on the cable while rotating it to
remove the outer insulation of the cable. Be careful
not to cut the twisted pairs inside. After removing
the outer insulation, visually inspect the twisted
pairs for damage. Do this on both ends of your
cable. If any of the cables are damaged, you need
to cut them and start over.
3. Untwist the twisted pairs and straighten them.
Once they are straightened put them into this
HANDS-ON ACTIVITY 3C 117
Cat5e
RJ45 Connectors
CABLE TESTER
Cutter
CRIMPER
Crimper
Stripper
FIGURE 3.30 Tools and materials for making a patch cable
order: Orange-white, Orange, Green-white, Blue,
Blue-white, Green, Brown-white, Brown.
4. Hold the cable in your right hand; the orange-
white wire should be closest to you. Hold the RJ45
connector in your left hand with the little “handle”
on the bottom.
5. Insert the wires inside the connector all the way to
the end—you should be able to see the colors of
the wires when you look at the front of the connec-
tor. Make sure that the wires don’t change order.
The white insulation should be about 1/3 of the
way inside the connector. (If you used the stripper
on the tool properly, the length of the wires will
be exactly as needed to fit to the RJ45 connector.)
6. Now you are ready to crimp the connector. Insert
the RJ45 connector to the crimper and press really
hard. This will push the gold contacts on the con-
nector onto the twisted pairs.
7. Crimp the other end of the cable by repeating steps
4 through 7.
8. The final step is to test your cable. Turn on the
cable tester and insert both ends of the patch cable
into the tester. If you see the flashing light going
down the indicators 1 through 8, not skipping any
number or changing the order, you made a fully
functional patch cable. If you don’t have a cable
tester, you can use the cable to connect your com-
puter into an Ethernet LAN. If you’re able to use
the LAN, the cable is working.
Deliverable
A working patch cable
CHAPTER4
DATA LINK LAYER
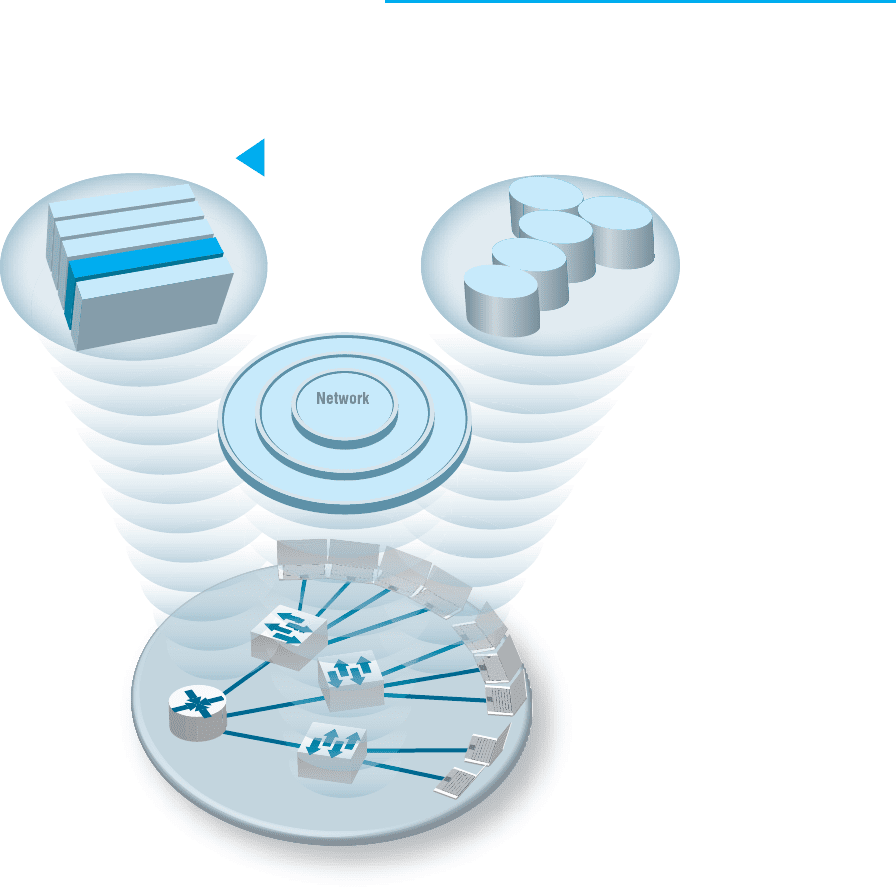
The Three Faces of Networking
The Three Faces of Networking
Fundamental Concepts Network Technologies
Network Management
S
ecurit
y
N
e
t
w
o
r
k
D
e
s
i
g
n
N
e
t
w
o
r
k
M
a
n
a
g
e
m
e
n
t
Application layer
Network layer
Data Link layer
Physical layer
LAN
WLAN
Backbone
WAN
Internet
Transport layer
CHAPTER OUTLINE 119
THE DATA link layer (also called layer 2) is responsible for moving
a message from one computer or network device to the next computer or
network device in the overall path from sender or receiver. It controls the way
messages are sent on the physical media. Both the sender and receiver have
to agree on the rules, or
protocols
, that govern how they will communicate
with each other. A
data link protocol
determines who can transmit at what
time, where a message begins and ends, and how a receiver recognizes and
corrects a transmission error. In this chapter, we discuss these processes,
as well as several important sources of errors.
OBJECTIVES
▲
Understand the role of the data link layer
Become familiar with two basic approaches to controlling access to the media
Become familiar with common sources of error and their prevention
Understand three common error detection and correction methods
Become familiar with several commonly used data link protocols
CHAPTER OUTLINE
▲
4.1 INTRODUCTION
4.2 MEDIA ACCESS CONTROL
4.2.1 Contention
4.2.2 Controlled Access
4.2.3 Relative Performance
4.3 ERROR CONTROL
4.3.1 Sources of Errors
4.3.2 Error Prevention
4.3.3 Error Detection
4.3.4 Error Correction via Retransmission
4.3.5 Forward Error Correction
4.3.6 Error Control in Practice
4.4 DATA LINK PROTOCOLS
4.4.1 Asynchronous Transmission
4.4.2 Synchronous Transmission
4.5 TRANSMISSION EFFICIENCY
4.6 IMPLICATIONS FOR MANAGEMENT

120 CHAPTER 4 DATA LINK LAYER
4.1 INTRODUCTION
In Chapter 1, we introduced the concept of layers in data communications. The data
link layer sits between the physical layer (hardware such as the circuits, computers, and
multiplexers described in Chapter 3) and the network layer (that performs addressing
and routing, as described in Chapter 5).
The data link layer is responsible for sending and receiving messages to and from
other computers. Its job is to reliably move a message from one computer over one
circuit to the next computer where the message needs to go.
The data link layer performs two main functions, and therefore is often divided
into two sublayers. The first sublayer (called the logical link control [LLC] sublayer)is
the data link layer’s connection to the network layer above it. At the sending computer,
the LLC sublayer software is responsible for communicating with the network layer
software (e.g., IP) and for taking the network layer Protocol Data Unit (PDU)—usually
an IP packet—and surrounding it with a data link layer PDU—often an Ethernet frame.
At the receiving computer, the LLC sublayer software removes the data link layer PDU
and passes the message it contains (usually an IP packet) to the network layer software.
The second sublayer (called the media access control [MAC] sublayer) controls
the physical hardware. The MAC sublayer software at the sending computer controls how
and when the physical layer converts bits into the physical symbols that are sent down
the circuit. At the receiving computer, the MAC sublayer software takes the data link
layer PDU from the LLC sublayer, converts it into a stream of bits, and controls when
the physical layer actually transmits the bits over the circuit. At the receiving computer,
the MAC sublayer receives a stream of bits from the physical layer and translates it into
a coherent PDU, ensures that no errors have occurred in transmission, and passes the
data link layer PDU to the LLC sublayer.
Both the sender and receiver have to agree on the rules or protocols that govern how
their data link layers will communicate with each other. A data link protocol performs
three functions:
•
Controls when computers transmit (media access control)
•
Detects and corrects transmission errors (error control)
•
Identifies the start and end of a message by using a PDU (message delineation)
4.2 MEDIA ACCESS CONTROL
Media access control refers to the need to control when computers transmit. With
point-to-point full-duplex configurations, media access control is unnecessary because
there are only two computers on the circuit and full duplex permits either computer to
transmit at any time.
Media access control becomes important when several computers share the same
communication circuit, such as a point-to-point configuration with a half-duplex config-
uration that requires computers to take turns, or a multipoint configuration in which
several computers share the same circuit. Here, it is critical to ensure that no two
4.2 MEDIA ACCESS CONTROL 121
computers attempt to transmit data at the same time—but if they do, there must be
a way to recover from the problem. There are two fundamental approaches to media
access control: contention and controlled access.
4.2.1 Contention
With contention computers wait until the circuit is free (i.e., no other computers are
transmitting) and then transmit whenever they have data to send. Contention is commonly
used in Ethernet LANs.
As an analogy, suppose that you are talking with some friends. People listen and if
no one is talking they can talk. If you want to say something, you wait until the speaker
is done and then you try to talk. Usually, people yield to the first person who jumps
in at the precise moment the previous speaker stops. Sometimes two people attempt to
talk at the same time, so there must be some technique to continue the conversation after
such a verbal collision occurs.
4.2.2 Controlled Access
Most wireless LANS use controlled access. In this case, the wireless access point con-
trols the circuit and determines which clients can transmit at what time. There are two
commonly used controlled access techniques: access requests and polling.
With the access request technique, client computers that want to transmit send a
request to transmit to the device that is controlling the circuit (e.g., the wireless access
point). The controlling device grants permission for one computer at a time to transmit.
When one computer has permission to transmit, all other computers wait until that com-
puter has finished, and then, if they have something to transmit, they use a contention
technique to send an access request.
The access request technique is like a classroom situation in which the instructor
calls on the students who raise their hands. The instructor acts like the controlling access
point. When they want to talk, students raise their hands and the instructor recognizes
them so they can contribute. When they have finished, the instructor again takes charge
and allows someone else to talk. And of course, just like in a classroom, the wireless
access point can choose to transmit whenever it likes.
Polling is the process of sending a signal to a client computer that gives it permis-
sion to transmit. With polling, the clients store all messages that need to be transmitted.
Periodically, the controlling device (e.g., a wireless access point) polls the client to see
if it has data to send. If the client has data to send, it does so. If the client has no data to
send, it responds negatively, and the controller asks another client if it has data to send.
There are several types of polling. With roll-call polling, the controller works
consecutively through a list of clients, first polling client 1, then client 2, and so on,
until all are polled. Roll-call polling can be modified to select clients in priority so that
some get polled more often than others. For example, one could increase the priority of
client 1 by using a polling sequence such as 1, 2, 3, 1, 4, 5, 1, 6, 7, 1, 8, 9.
Typically, roll-call polling involves some waiting because the controller has to poll
a client and then wait for a response. The response might be an incoming message that
was waiting to be sent, a negative response indicating nothing is to be sent, or the full
122 CHAPTER 4 DATA LINK LAYER
“time-out period” may expire because the client is temporarily out of service (e.g., it is
malfunctioning or the user has turned it off). Usually, a timer “times out” the client after
waiting several seconds without getting a response. If some sort of fail-safe time-out is
not used, the circuit poll might lock up indefinitely on an out-of-service client.
With hub polling (often called token passing), one device starts the poll and passes
it to the next computer on the multipoint circuit, which sends its message and passes
the poll to the next. That computer then passes the poll to the next, and so on, until it
reaches the first computer, which restarts the process again.
4.2.3 Relative Performance
Which media access control approach is best: controlled access or contention? There is
no simple answer. The key consideration is throughput—which approach will permit the
most amount of user data to be transmitted through the network.
In general, contention approaches work better than controlled approaches for small
networks that have low usage. In this case, each computer can transmit when necessary,
without waiting for permission. Because usage is low, there is little chance of a collision.
In contrast, computers in a controlled access environment must wait for permission, so
even if no other computer needs to transmit, they must wait for the poll.
The reverse is true for large networks with high usage: controlled access works
better. In high-volume networks, many computers want to transmit, and the probability
of a collision using contention is high. Collisions are very costly in terms of throughput
because they waste circuit capacity during the collision and require both computers to
retransmit later. Controlled access prevents collisions and makes more efficient use of the
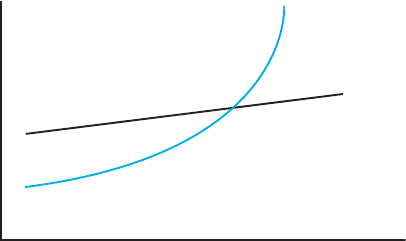
circuit, and although response time does increase, it does so more gradually (Figure 4.1).
The key to selecting the best access control technique is to find the crossover point
between controlled and contention. Although there is no one correct answer, because it
depends on how many messages the computers in the network transmit, most experts
believe that the crossover point is often around 20 computers (lower for busy computers,
higher for less-busy computers). For this reason, when we build shared multipoint circuits
like those often used in LANs or wireless LANs, we try to put no more than 20 computers
on any one shared circuit.
Traffic
Response time
Contention
Low
Short
Long
High
Controlle
d
access
FIGURE 4.1 Relative
response times

4.3 ERROR CONTROL 123
4.3 ERROR CONTROL
Before learning the control mechanisms that can be implemented to protect a network
from errors, you should realize that there are human errors and network errors. Human
errors, such as a mistake in typing a number, usually are controlled through the application
program. Network errors, such as those that occur during transmission, are controlled by
the network hardware and software.
There are two categories of network errors: corrupted data (data that have been
changed) and lost data. Networks should be designed to (1) prevent, (2) detect, and (3)
correct both corrupted data and lost data. We begin by examining the sources of errors
and how to prevent them and then turn to error detection and correction.
Network errors are a fact of life in data communications networks. Depending on
the type of circuit, they may occur every few hours, minutes, or seconds because of
noise on the lines. No network can eliminate all errors, but most errors can be prevented,
detected, and corrected by proper design. IXCs that provide data transmission circuits
provide statistical measures specifying typical error rates and the pattern of errors that
can be expected on the circuits they lease. For example, the error rate might be stated as
1 in 500,000, meaning there is 1 bit in error for every 500,000 bits transmitted.
Normally, errors appear in bursts. In a burst error, more than 1 data bit is changed
by the error-causing condition. In other words, errors are not uniformly distributed in
time. Although an error rate might be stated as 1 in 500,000, errors are more likely to
occur as 100 bits every 50,000,000 bits. The fact that errors tend to be clustered in bursts
rather than evenly dispersed is both good and bad. If the errors were not clustered, an
error rate of 1 bit in 500,000 would make it rare for 2 erroneous bits to occur in the
same character. Consequently, simple character-checking schemes would be effective at
detecting errors. When errors are #ore or less evenly distrib#ted, it is not di#ficult to gras#
the me#ning even when the error #ate is high, as it is in this #entence (1 charac#er in 20).
But burst errors are the rule rather than the exception, often obliterating 100 or more bits
at a time. This makes it more difficult to recover the meaning, so more reliance must be
placed on error detection and correction methods. The positive side is that there are long
periods of error-free transmission, meaning that very few messages encounter errors.
4.3.1 Sources of Errors
Line noise and distortion can cause data communication errors. The focus in this section
is on electrical media such as twisted-pair wire and coaxial cable, because they are more
likely to suffer from noise than are optical media such as fiber-optic cable. In this case,
noise is undesirable electrical signals (for fiber-optic cable, it is undesirable light). Noise
is introduced by equipment or natural disturbances, and it degrades the performance of
a communication circuit. Noise manifests itself as extra bits, missing bits, or bits that
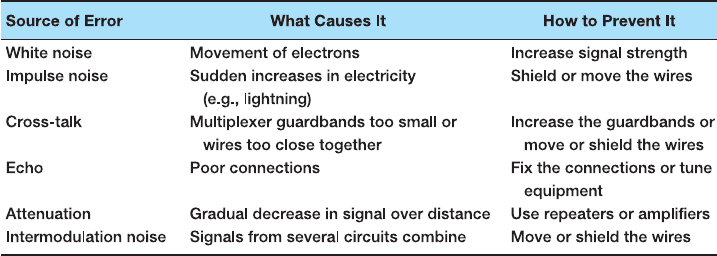
have been “flipped” (i.e., changed from 1 to 0 or vice versa). Figure 4.2 summarizes the
major sources of error and ways to prevent them. The first six sources listed there are
the most important; the last three are more common in analog rather than digital circuits.
White noise or Gaussian noise (the familiar background hiss or static on radios and
telephones) is caused by the thermal agitation of electrons and therefore is inescapable.
124 CHAPTER 4 DATA LINK LAYER
FIGURE 4.2 Sources of errors and ways to minimize them
Even if the equipment were perfect and the wires were perfectly insulated from any and
all external interference, there still would be some white noise. White noise usually is
not a problem unless it becomes so strong that it obliterates the transmission. In this
case, the strength of the electrical signal is increased so it overpowers the white noise;
in technical terms, we increase the signal-to-noise ratio.
Impulse noise (sometimes called spikes) is the primary source of errors in data
communications. It is heard as a click or a crackling noise and can last as long as
1
/
100
of a second. Such a click does not really affect voice communications, but it can obliterate
a group of data, causing a burst error. At 1.5 Mbps, 15,000 bits would be changed by
a spike of
1
/
100
of a second. Some of the sources of impulse noise are voltage changes
in adjacent lines, lightning flashes during thunderstorms, fluorescent lights, and poor
connections in circuits.
Cross-talk occurs when one circuit picks up signals in another. A person experi-
ences cross-talk during telephone calls when she or he hears other conversations in the
background. It occurs between pairs of wires that are carrying separate signals, in multi-
plexed links carrying many discrete signals, or in microwave links in which one antenna
picks up a minute reflection from another antenna. Cross-talk between lines increases
with increased communication distance, increased proximity of the two wires, increased
signal strength, and higher-frequency signals. Wet or damp weather can also increase
cross-talk. Like white noise, cross-talk has such a low signal strength that it normally is
not bothersome.
Echoes are the result of poor connections that cause the signal to reflect back to
the transmitting equipment. If the strength of the echo is strong enough to be detected,
it causes errors. Echoes, like cross-talk and white noise, have such a low signal strength
that they normally are not bothersome. Echoes can also occur in fiber-optic cables when
connections between cables are not properly aligned.
Attenuation is the loss of power a signal suffers as it travels from the transmitting
computer to the receiving computer. Some power is absorbed by the medium or is lost
before it reaches the receiver. As the medium absorbs power, the signal becomes weaker,
and the receiving equipment has less and less chance of correctly interpreting the data.
This power loss is a function of the transmission method and circuit medium. High
frequencies lose power more rapidly than do low frequencies during transmission, so