FitzGerald J., Dennis A., Durcikova A. Business Data Communications and Networking
Подождите немного. Документ загружается.


8.7 IMPROVING WAN PERFORMANCE 295
8.6
GIGABIT ETHERNET
IN THE
NETHERLANDS
MANAGEMENT
FOCUS
SURFnet is the national computer network for
education and research in the Netherlands.
Demand for network capacity had been rapidly
growing as more and more students started using
the Internet, so SURFnet began looking for a way
to significantly upgrade its WAN that connects
more than 50 universities, libraries, and research
centers.
SURFnet considered implementing SONET or
ATM OC-192, but felt that 10 Gbps Ethernet pro-
vided similar data rates, was more familiar to their
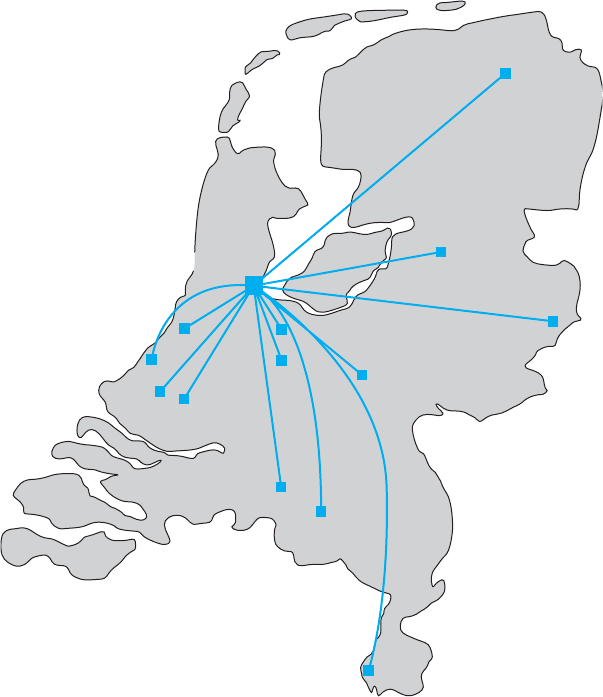
customers, and was more scaleable. SURFnet has
leased fiber from Amsterdam to major regional
centers around the Netherlands (Figure 8.16).
Each of these regional centers is a POP and
in turn provides connections to other universi-
ties, libraries, and research centers in its region,
often via a 1 Gbps or 100 Mbps Ethernet WAN.
Sometimes SONET, ATM, or E-carrier services
(the European equivalent to T carrier services)
are used for the regional connections, depending
upon the demand.
SOURCE: ‘‘Cisco Helps SURFnet Provide 10 Gigabit
Ethernet to Higher Education and Research
Community,’’ www.cisco.com, 2004.
Another strategy is examining the routing protocol, either static or dynamic.
Dynamic routing will increase performance in networks that have many possible routes
from one computer to another and in which message traffic is “bursty”—that is, in
which traffic occurs in spurts, with many messages at one time, and few at others.
But dynamic routing imposes an overhead cost by increasing network traffic. In some
cases, the traffic and status information sent between computers accounts for more than
50 percent of all WAN message traffic. This is clearly a problem because it drastically
reduces the amount of network capacity available for users’ messages. Dynamic routing
should use no more than 10 to 20 percent of the network’s total capacity.
8.7.2 Improving Circuit Capacity
The first step is to analyze the message traffic in the network to find which circuits
are approaching capacity. These circuits then can be upgraded to provide more capac-
ity. Less-used circuits can be downgraded to save costs. A more sophisticated analysis
involves examining why circuits are heavily used. For example, in Figure 8.3, the circuit
from San Francisco to Vancouver may be heavily used, but much traffic on this circuit
may not originate in San Francisco or be destined for Vancouver. It may, for example, be
going from Los Angeles to Toronto, suggesting that adding a circuit here would improve
performance to a greater extent than upgrading the San Francisco-to-Vancouver circuit.
The capacity may be adequate for most traffic but not for meeting peak demand.
One solution may be to add a circuit-switched or packet-switched service that is used only
when demand exceeds circuit capacity. The use of a service as a backup for heavy traffic
provides the best of both worlds. The lower-cost dedicated circuit is used constantly, and
the backup service is used only when necessary to avoid poor response times.
Sometimes a shortage of capacity may be caused by a faulty circuit. As circuits
deteriorate, the number of errors increases. As the error rate increases, throughput falls
because more messages have to be retransmitted. Before installing new circuits, monitor
296 CHAPTER 8 WIDE AREA NETWORKS
Amsterdam
Leiden
Den Haag
Delft
Rotterdam
Tilburg
Eindhaven
Maastricht
Wageningen
Utrecht
Enschede
Zwolf
Groningen
Hilversun
FIGURE 8.16 The
SURFnet gigabit Ethernet WAN
the existing ones to ensure that they are operating properly or ask the common carrier
to do it.
8.7.3 Reducing Network Demand
There are many ways to reduce network demand. One simple step is to require a network
impact statement for all new application software developed or purchased by the orga-
nization. This focuses attention on the network impacts at an early stage in application
development. Another simple approach is to use data compression techniques for all data
in the network.
Another sometimes more difficult approach is to shift network usage from peak
or high-cost times to lower-demand or lower-cost times. For example, the transmission
of detailed sales and inventory reports from a retail store to headquarters could be done
after the store closes. This takes advantage of off-peak rate charges and avoids interfering
with transmissions requiring higher priority such as customer credit card authorizations.

SUMMARY 297
The network can be redesigned to move data closer to the applications and people
who use them. This also will reduce the amount of traffic in the network. Distributed
database applications enable databases to be spread across several different computers.
For example, instead of storing customer records in one central location, you could store
them according to region.
8.8 IMPLICATIONS FOR MANAGEMENT
As the amount of digital computer data flowing through and WANs has increased and as
those networks have become increasingly digital, the networking and telecommunications
vice president role has significantly changed over the past 10 years. Traditionally this vice
president has been responsible for computer communications; today in most companies,
this individual is also responsible for telephone and voice services.
T carrier, SONET, and ATM have traditionally dominated the WAN market. How-
ever, with the growing use of VPNs and Ethernet and MPLS services, we are beginning
to see a major change. In the early 1990s, the costs of WANs were quite high. As
these networks have changed to increasingly digital technologies, and as competition has
increased with the introduction of new companies and new technologies (e.g., VPNs,
Ethernet services), costs have begun to drop. More firms are now moving to implement
software applications that depend on low-cost WANs.
The same factors that caused the LAN and BN to standardize on a few technologies
(Ethernet, wireless Ethernet) are now acting to shape the future of the WAN. We believe
that within five years, ATM will disappear and will be replaced by Ethernet and MPLS
services. Within ten years, ISDN, T-carrier, and SONET may also disappear.
These changes have also had significant impacts on the manufacturers of net-
working equipment designed for WANs. Market shares and stock prices have shifted
dramatically over the last five years in favor of companies with deep experience in
backbone technologies (e.g., Ethernet) and Internet technologies (e.g., IP) as those tech-
nologies spread into the WAN market.
SUMMARY
Circuit-Switched Networks Circuit-switched services enable you to define the end points of the
WAN without specifying all the interconnecting circuits through carrier’s cloud. The user dials the
number of the destination computer to establish a temporary circuit, which is disconnected when
the data transfer is complete. POTS is traditional dial-up service. BRI ISDN provides a commu-
nication circuit with two 64-Kbps digital transmission channels and one 16-Kbps control channel.
PRI ISDN consists of 23 64-Kbps data channels and one 64-Kbps control channel.
Dedicated-Circuit Networks A dedicated circuit is leased from the common carrier for exclusive
use 24 hours per day, 7 days per week. Faster and more noise-free transmissions are possible, but
you must carefully plan the circuits you need because changes can be expensive. The three common
architectures are ring, star, and mesh. T carrier circuits have a set of digital services ranging from
FT1 (64 Kbps) to T1 (1.544 Mbps) to T4 (274 Mbps). A SONET uses fiber optics to provide
services ranging from OC-1 (51 Mbps) to OC-12 (622 Mbps).

298 CHAPTER 8 WIDE AREA NETWORKS
Packet-Switched Networks Packet switching is a technique in which messages are split into small
segments. The user buys a connection into the common carrier cloud and pays a fixed fee for the
connection into the network and for the number of packets transmitted. ATM does not perform
error control, and it offers data rates up to 622 Mbps. Frame relay, a newer packet-switching service
with data rates up to 45 Mbps, does not perform error control. Ethernet services use Ethernet and
IP to transmit packets at speeds between 1 Mbps and 1 Gbps.
VPN Networks MPLS supports a variety of protocols that can run faster than other types of
services. A VPN provides a packet service network over the Internet. The sender and receiver
have VPN devices that enable them to send data over the Internet in encrypted form through a
VPN tunnel. Although VPNs are inexpensive, traffic delays on the Internet can be unpredictable.
The Best Practice WAN Design For small WANs with low data transmission needs, VPN
or frame relay services are reasonable alternatives. For networks with moderate data transmis-
sion needs (64 Kbps–2 Mbps), a VPN is a good choice if cost is more important than reliability;
otherwise, frame relay MPLS or T carrier services are good choices. For high-traffic networks
(2 Mbps–45 Mbps), the new Ethernet services are a dominant choice, but some organizations may
prefer the more mature—and therefore proven—T3 or frame relay services. For very high-traffic
networks (45 Mbps–1 0 Gbps), Ethernet services are a dominant choice but again some organiza-
tions may prefer the more mature ATM or SONET services. Unless their data needs are stable,
network managers often start with more flexible packet-switched services and move to the usu-
ally cheaper dedicated-circuit services once their needs have become clear and an investment in
dedicated services is safer.
Improving WAN Performance One can improve network performance by improving the speed of
the devices themselves and by using a better routing protocol. Analysis of network usage can show
what circuits need to be increased or decreased in capacity, what new circuits need to be leased,
and when additional switched circuits may be needed to meet peak demand. Reducing network
demand may also improve performance. Including a network usage analysis for all new application
software, using data compression, shifting usage to off-peak times, establishing priorities for some
applications, or redesigning the network to move data closer to those who use it are all ways to
reduce network demand.
KEY TERMS
access VPN
asynchronous transfer
mode (ATM)
basic rate interface (BRI)
Canadian
Radio-Television and
Telecommunications
Commission (CRTC)
channel service unit/data
service unit (CSU/DSU)
circuit-switched services
cloud
cloud architecture
committed information
rate (CIR)
common carrier
datagram
dedicated-circuit services
discard eligible (DE)
distributed star
architecture
Ethernet services
Encapsulating Security
Payload (ESP)
extranet VPN
Federal Communications
Commission (FCC)
fractional T1 (FT1)
frame relay
full-mesh architecture
integrated services digital
network (ISDN)
interexchange carrier
(IXC)
Internet Service Provider
(ISP)
intranet VPN
IPSec
L2TP
latency
layer-2 VPN
layer-3 VPN
local exchange carrier
(LEC)
maximum allowable rate
(MAR)
mesh architecture
multi-protocol label
switching (MPLS)
narrowband ISDN
network terminator (NT-1,
NT-2)
packet
assembly/disassembly
(PAD)
packet services
packet-switched networks
partial-mesh architecture

QUESTIONS 299
permanent virtual circuit
(PVC)
plain old telephone
service (POTS)
point of presence (POP)
primary rate interface
(PRI)
public switched telephone
network (PSTN)
public utilities
commission (PUC)
ring architecture
service profile identifier
(SPID)
star architecture
switched virtual circuit
(SVC)
synchronous digital
hierarchy (SDH)
synchronous optical
network (SONET)
T carrier circuit
T1, T2, T3, T4 circuits
terminal adapter (TA)
2B+D
23B+D
virtual circuit
virtual private network
(VPN)
VPN gateway
VPN software
QUESTIONS
1. What are common carriers, local exchange
carriers, and interexchange carriers?
2. Who regulates common carriers and
how is it done?
3. Explain how a cloud architecture works.
4. What is POTS?
5. How does ISDN work?
6. Compare and contrast BRI and PRI ISDN.
7. What is a 2B+D?
8. How does MPLS work?
9. Compare and contrast circuit-switched
services, dedicated-circuit services, and
packet-switched services.
10. Is a WAN that uses dedicated circuits eas-
ier or harder to design than one that uses
dialed circuits? Explain.
11. Compare and contrast ring architecture, star
architecture, and mesh architecture.
12. What are the most commonly used T carrier ser-
vices? What data rates do they provide?
13. Distinguish among T1, T2, T3, and T4 circuits.
14. Describe SONET. How does it differ from SDH?
15. How do packet-switching services differ
from other WAN services?
16. How is a virtual circuit distinguished
from other circuits?
17. Where does packetizing take place?
18. What does a packet contain?
19. What do you think the future of ISDN
holds? Why?
20. How do datagram services differ from
virtual circuit services?
21. How does an SVC differ from a PVC?
22. Compare and contrast frame relay, ATM,
and Ethernet services.
23. Which is likely to be the longer-term winner:
X.25, frame relay, ATM, MPLS, or Ethernet
services?
24. Explain the differences between CIR and MAR.
25. How do VPN services differ from com-
mon carrier services?
26. Explain how VPN services work.
27. Compare the three types of VPN.
28. How can you improve WAN performance?
29. Describe five important factors in select-
ing WAN services.
30. Are Ethernet services a major change in the future
of networking or a technology blip?
31. Are there any WAN technologies that
you would avoid if you were building a
network today? Explain.
32. Suppose you joined a company that had a
WAN composed of SONET, T carrier ser-
vices, ATM, and frame relay, each selected
to match a specific network need for a cer-
tain set of circuits. Would you say this was
a well-designed network? Explain.
33. It is said that packet-switched services and
dedicated-circuit services are somewhat similar
from the perspective of the network designer.
Why?

300 CHAPTER 8 WIDE AREA NETWORKS
EXERCISES
8-1. Find out the d ata rates and costs of T carrier services
in your area.
8-2. Find out the data rates and costs of packet-switched
and dedicated-circuit services in your area.
8-3. Investigate the WAN of a company in your area.
Draw a network map.
8-4. Using Figure 8.11:
a. Suppose the example used a layer-2 VPN pro-
tocol called L2TP. Draw the messages and the
packets they would contain.
b. Suppose the Web server was an email server.
Draw the messages from the email server to the
employee’s computer. Show what packets would
be in the message.
c. Suppose the office connects to its ISP using
metro Ethernet. What packets would be in the
message from the office router to the ISP?
d. Suppose the employee connects to the ISP using
a layer-2 protocol called XYZ. What packets
would be in the message from the employes’s
router to the ISP?
MINI-CASES
I. Cookies Are Us
Cookies Are Us runs a series of 100 cookie stores across the midwestern United States and central Canada.
At the end of each day, the stores express-mail a diskette or two of sales and inventory data to headquarters,
which uses the data to ship new inventory and plan marketing campaigns. The company has decided to move
to a WAN. What type of a WAN architecture and WAN service would you recommend? Why?
II. MegaCorp
MegaCorp is a large manufacturing firm that operates 5 factories in Dallas, 4 factories in Los Angeles, and
5 factories in Albany, New York. It operates a tightly connected order management system that coordinates
orders, raw materials, and inventory across all 14 factories. What type of WAN architecture and WAN service
would you recommend? Why?
III. Sunrise Consultancy
Sunrise Consultancy is a medium-sized consulting firm that operates 17 offices around the world (Dallas,
Chicago, New York, Atlanta, Miami, Seattle, Los Angeles, San Jose, Toronto, Montreal, London, Paris, Sao
Paulo, Singapore, Hong Kong, Sydney, and Bombay). They have been using Internet connections to exchange
email and files, but the volume of traffic has increased to the point that they now want to connect the offices
via a WAN. Volume is low but expected to grow quick ly once they implement a new knowledge management
system. What type of a WAN topology and WAN service would you recommend? Why?
IV. CareGroup
Reread Management Focus 8.1. What other alternativ es do you think that Cleveland Transit considered? Why
do you think they did what they did?

HANDS-ON ACTIVITY 8A 301
V. Fire Departments
Reread Management Focus 8.2. What other alternatives do you think that Air China considered? Why do you
think they did what they did?
VI. CISCO Systems Inc.
Reread Management Focus 8.3. What alternatives do you think CISCO systems considered? Why do you think
they did what they did?
VII. Energy Sciences Network
Reread Management Focus 8.5. What other alternatives do you think that the Energy Sciences Network con-
sidered? Why do you think they did what they did?
VIII. SURFnet
Reread Management Focus 8.6. What other alternatives do you think that SURFnet considered? Why do you
think they did what they did?
CASE STUDY
NEXT-DAY AIR SERVICE
See the Web site.
HANDS-ON ACTIVITY 8A
Examining Wide Area Neworks
There are millions of WANs in the world. Some are run
by common carriers and are available to the public. Oth-
ers are private networks run by organizations for their
internal use only. Thousands of these networks have been
documented on the Web.
Explore the Web to find networks offered by common
carriers and compare the types of network circuits they
have. Now do the same for public and private organiza-
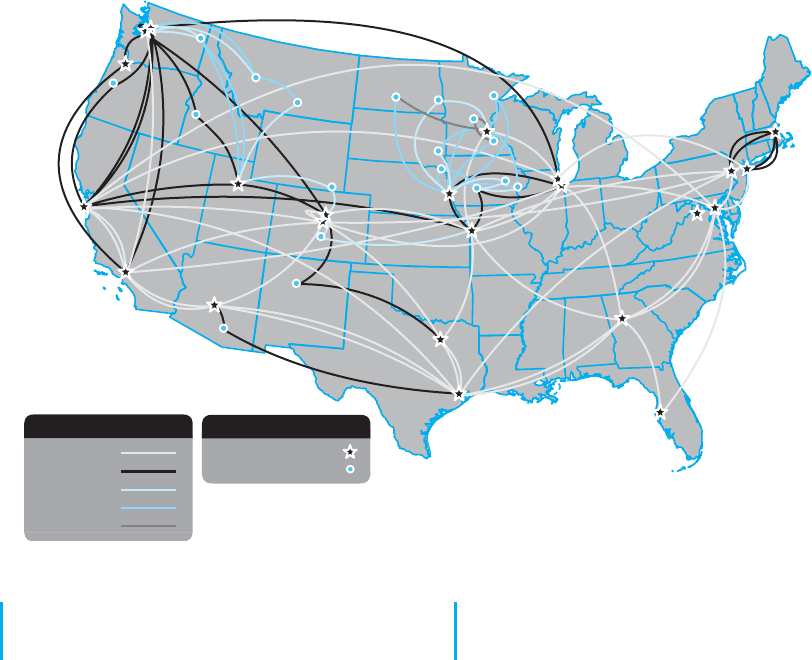
tions to see what they have. Figure 8.17 shows the net-
work map for Quest (www-test.quest.com/largebusiness/
enterprisesolutions/downloads/0703-NA
IP Map2 07
.pdf), a large common carrier in the United States. This
shows the services offered in each major city, as well as
the size of the circuits connecting cities.
Other interesting WAN maps, including dynamic
maps, are available from:
Cable and Wireless: www.cw.com/our
network/
network
maps
Cogent: www.cogentco.com/htdocs/map.php
Sprint/Nextel: www.sprintworldwide.com/english/
maps/
TATA Communications: www.tatacommunica
tions.com/map/gfp.html
Deliverable
Print three different WAN maps. For each map, identify
the different types of circuits in use; for example, does
the WAN use only T1 circuits or are there a mix of tech-
nologies in use?
302 CHAPTER 8 WIDE AREA NETWORKS
Seattle
Portland
Eugene
San Francisco
Sunnyvale
Spokane
Boise
Salt Lake City
Helena
Billings
Cheyenne
Denver
Colorado Springs
Albuquerque
Phoenix
Tucson
Los Angeles
Burbank
Bismarck
Fargo
Sioux Falls
Duluth
St. Cloud
Minneapolis/St. Paul
Sioux City
Omaha
Des Moines
Cedar Rapids
Davenport
Cermak
Chicago
Kansas City
St. Louis
Dallas
Houston
Atlanta
Tampa
Sterling
Washington D.C.
Newark
New York City
Boston
Rochester
Tera POP
Access POP
Points of Presence
Circuit Definitions
OC-192
OC-48
OC-12
OC-3
DS-3
FIGURE 8.17 QUEST’S WAN
HANDS-ON ACTIVITY 8B
Examining VPNs with Wireshark
If you want to see VPNs in action and understand how
they protect your data as it moves over the Internet, you
can sniff your packets with Wireshark. In order to do this
lab, you’ll have to have a VPN you can use. This will
normally be available from your school.
In this exercise, you’ll use Wireshark to sniff the pack-
ets with and without the VPN. Before you start, you’ll
need to download and install Wireshark, a packet sniffer
software package, on your computer.
1. Start the VPN software on your computer.
2. Start a Web browser (e.g., Internet Explorer) and
go to a Web site.
3. Start Wireshark and click on the Capture menu
item. This will open up a new menu (see the very
top of Figure 8.18). Click o n Interfaces.
4. This will open a new window that will enable
you to select which interface you want to capture
packets from. Figure 8.18 shows you the three
interfaces I have on my computer. The first inter-
face is a dial-up modem that I never use. The
second interface (labeled “Broadcom NetXtreme
Gigabit Ethernet Driver”) is my Ethernet local area
network. It has the IP address of 192.168.1.104.
The third interface (labeled “WN (PPP/SLIP)
Interface”) is the VPN tunnel; it has an IP address
of 156.56.198.144 and only appears when you
start the VPN software and log-in to a VPN gate-
way. If you do a WhoIs on this IP address (see
Chapter 5 for WhoIs), you will see that this IP
address is owned by Indiana University. When I
logged into my VPN software, it assigned this IP
address to the tunnel so that all IP packets that
leave my computer over this tunnel will appear to
be from a computer on a subnet on the Indiana
University campus that is connected to the VPN
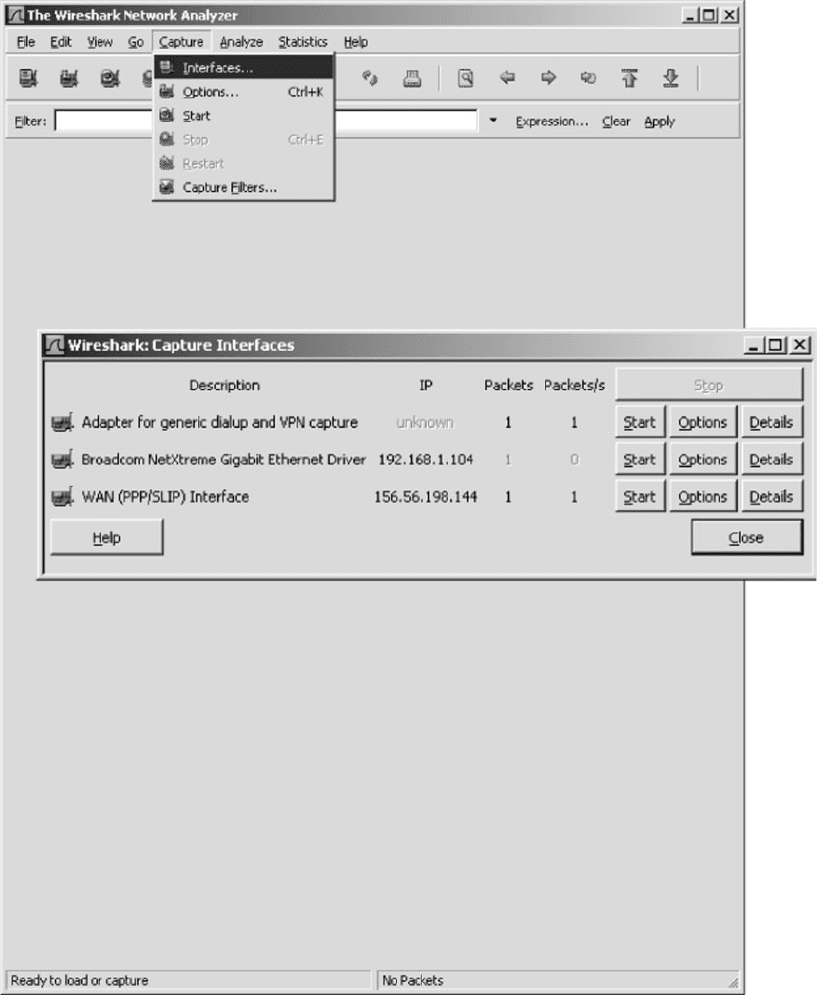
HANDS-ON ACTIVITY 8B 303
FIGURE 8.18 Starting Wireshark

304 CHAPTER 8 WIDE AREA NETWORKS
gateway. Your computer will have different inter-
faces and IP addresses because your network is
different than mine, but the interfaces should be
similar.
5. Start by capturing packets on your regular Ethernet
Interface. In my case, this is the second interface.
Click on the Start button beside the Ethernet driver
(which is 192.168.1.104 on my computer).
6. Go to your Web browser and use it to load a new
Web page, which will cause some packets to move
through your network.
7. A screen similar to that in Figure 8.19 will appear.
After a few seconds, go back to Wireshark and
click the Interface menu item and then click Stop.
8. The top window in Figure 8.19 shows the packets
that are leaving the computer through the tunnel.
Click on a packet to look at it. The middle win-
dow in this figure shows what’s inside the packet.
We see an Ethernet frame, an IP packet, a UDP
datagram, and an Encapsulating Security Payload
packet (which is the ESP packet). Notice that
you cannot see anything inside the ESP packet
because its contents are encrypted. All packets
in this tunnel will only flow to and from my
computer (192.168.1.104) and the VPN gateway
(156.56.245.15).
9. Now we want to look at the packets that are sent
by your computer into the VPN tunnel. No one
else can see these packets. You can see them only
because they are on your computer and you’re
looking at them as they move from your traditional
network software to your VPN software.
10. Click on the Wireshark Capture menu item and
click Interfaces.
11. Click on the Start button beside your VPN inter-
face, which in my case in Figure 8.18 is the button
in front of 156.56.198.144.
12. Go to your Web browser and use it to load a new
Web page, which will cause some packets to move
through your network.
13. A screen similar to that in Figure 8.20 will appear.
After a few seconds, go back to Wireshark and
click the Interface menu item, and then click Stop.
14. The top window in Figure 8.20 shows the pack-
ets that are entering the VPN tunnel. Click on an
HTTP packet to look at it (you may need to scroll
to find one). The middle window in this figure
shows what’s inside the packet. We see an Eth-
ernet frame, an IP packet, a TCP segment, and
an HTTP request (for a page called/enterprise/on
www.tatacommunications.com). We can see these
because they have not yet entered the VPN soft-
ware to be encrypted. These are the packets that
would normally be sent over the Internet if we
have not started the VPN software. Like all nor-
mal Internet messages, they can be read by anyone
with sniffer software such as Wireshark.
Deliverables
1. What layer-2, -3, and -4 protocols are used on
your network to transmit an HTTP packet without
aVPN?
2. What layer-2, -3, and -4 protocols are used on
your network to transmit an HTTP packet when
your VPN is active?
3. Look inside the VPN tunnel as was done in step
14. What layer-2, -3, and -4 protocols are used
inside the encrypted packet?
HANDS-ON ACTIVITY 8C
Examining VPNs with Tracert
Tracert is a useful tool for seeing how VPNs affect rout-
ing. In order to do this lab, you’ll have to have a VPN
you can use. This will normally be available from your
school.
Tracert is a simple command that comes preinstalled
on all Windows and Mac computers. Tracert enables you
to see the route that an IP packet takes as it moves over
the Internet from one computer to another. Do this activity
when you are not on campus.
1. Tracert is command line command, so you first
need to start the CMD window. Click Start, then
Run, and then type CMD and press enter. This
will open the command window, which is usually
a small window with a black background. You can