Graef M. Introduction to conventional transmission electron microscopy
Подождите немного. Документ загружается.

268 Getting started
we will see that the dark field images for g and −g are identical. Summarizing,
to obtain a centered dark field image for the reflection g we bring −g onto the
optical axis using the beam tilt controls. After insertion of the diffraction aperture,
we can simply switch from BF to the CDF image by pressing a single button on
the microscope console. When you switch back and forth in diffraction mode you
will see the diffraction pattern jump between the two positions; when you switch
back and forth in image mode the image will switch from BF to DF and back.
Both images should be simultaneously in focus, provided all alignments have been
carried out properly.
We will see later on in this book that the first method of bringing g to the optical
axis is very useful, and is the basis of the so-called weak beam imaging method,
also known as g–3g imaging. This is a very powerful method for observing crystal
defects with a high spatial resolution. The dark field images thus obtained do not
suffer from spherical aberration since the electrons travel along the optical axis, as
they do in the CDF technique. As you have discovered, such weak beam images
have a very low overall intensity and require long exposure times.
4.4.2.6 Astigmatism and BF/DF images
Astigmatism is a parasitic lens aberration, which means that it is caused by imper-
fections in the lens surfaces, inhomogeneities in the lens coils, or possibly by small
magnetic fields caused by the sample itself. Astigmatism correction is perhaps the
most difficult aspect of electron microscopy; it takes practice and a skilled micro-
scopist can correct astigmatism about as well as a computerized system, which uses
discrete Fourier transforms of digital images.
The easiest procedure for astigmatism correction relies on the use of Fresnel
fringes; these fringes arise wherever the specimen has an edge or any other discon-
tinuity. Electrons scattered from the edge (in a spherically scattered wave) interfere
with the transmitted electron beam and form an interference pattern. The number of
fringes in this pattern is a direct measure of the beam coherence. For conventional
TEM one can usually distinguish only one fringe; for a field emission machine as
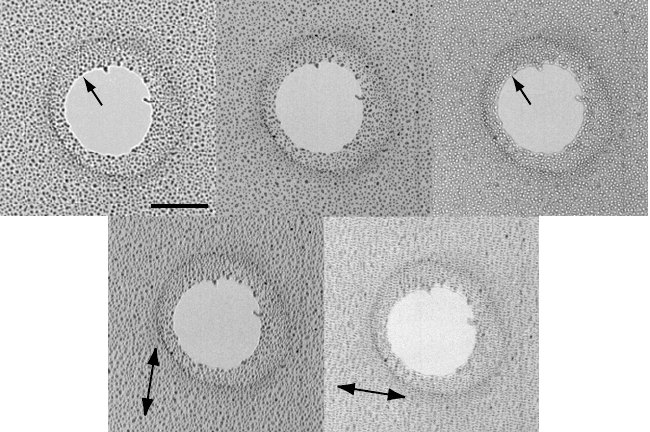
many as 100 fringes have been observed. As shown in the through-focus series
of gold particles on a holey carbon support film in Figs 4.14(a)–(c), this fringe is
bright in under-focus and dark in over-focus. By changing the current through the
objective lens we can switch from one to the other. The fringe must have the same
distance to the sample edge all around the hole; if this distance is not constant,
or if part of the fringe is bright and part dark, then astigmatism is present in the
image, as ilustrated in Figs 4.14(d) and (e). Correction of the astigmatism either
involves obtaining a circular Fresnel fringe around the entire hole, or, alternatively,
no preferential direction in the image. The images in Figs 4.14(d) and (e) clearly
4.4 A typical microscope session 269
in-focus
-2
µm +2 µm
-2
µm
+2
µm
(a)
(b)
(c)
(d) (e)
100 nm
bright
fringe
dark
fringe
Fig. 4.14. Illustration of the effect of astigmatism on Fresnel fringes around a circular hole
in a holey carbon film with gold particles. Parts (a)–(c) are a through-focus series with
prefectly corrected astigmatism. Parts (d) and (e) show the clear presence of astigmatism,
indicated by the absence of a Fresnel fringe around the entire hole, and the presence of a
preferential direction (arrowed) in the image. (JEOL 2000EX operated at 200 kV.)
show a preferential direction (arrowed). Astigmatism can be corrected by removing
this preferential direction from the images for all focus values. Astigmatism cor-
rection is easiest when there are small holes in the sample. If there are no holes,
then you may have to move to the edge of the sample, specifically where the edge
is not perfectly straight.
†
At the highest magnifications one can often observe a
narrow amorphous area at the edge of a sample (even a crystalline sample) and
this amorphous area can be used to correct the astigmatism (see Chapter 10 for
examples).
4.4.2.7 Taking good pictures
Now you are ready to take a picture of what you see on the viewing screen. This is
a crucial step and you should learn how to properly expose an electron micrograph,
either the standard photographic negative or the electronic (digital) version. The
exposure time τ should be such that the relevant information will be recorded in
the nearly linear part of the characteristic curve (see page 229). If τ is too short,
†
You cannot use a straight Fresnel fringe to correct astigmatism. Why not?
270 Getting started
portions of your image may be invisible (intensity below the fog level of the film
or the background level of the CCD camera); if τ is too long, the film will be
overexposed and saturated.
We know from Chapter 3 that the density of a developed negative is related to
the number of electrons per unit area that hit the emulsion. We have estimated this
number using the concept of beam brightness on page 186. Typical current densities
are in the range of tenths to hundreds of pA cm
−2
, which translates into exposure
times in the range of 0.1 to several tens of seconds, considerable longer than the
times needed for most conventional light photography.
Every TEM is equipped with a sensitive exposure meter, which measures the
current density at the screen. It is important to realize that this is an average num-
ber, and that local current densities can be several orders of magnitude larger or
smaller than the average, in particular for electron diffraction patterns. The ex-
posure meter signal is automatically converted into an exposure time τ , and the
microscope operator can choose to use this value as the exposure time (automatic
exposure mode) or to set a different value (manual exposure mode). The au-
tomatic exposure mode has one adjustable parameter known as film sensitivity
(related to the electron speed of the film). This parameter is set once and for
all after a series of calibration exposures, and should be changed only if the ex-
posure meter is replaced or if the user switches to a different brand or type of
negatives.
The automatic exposure mode can be used for bright field images that do not
have significant contrast variations (i.e. rapid intensity changes from bright to dark
regions). Depending on the microscope magnification you may have exposure times
in the range 0.1–2 s. It is usually not a good idea to focus the incident beam using
the C2 lens so that maximum intensity is observed on the screen. A converged
incident beam has a lower beam coherence than a parallel beam and you may want
to record image details (such as Fresnel fringes) that are only visible for a reasonably
coherent beam. So, even if you have more electrons available to reduce the exposure
time, sometimes you will need to use a longer exposure time. For many dark field
images the image contrast will vary strongly from one location to the next, and
the automatic exposure meter will typically underestimate the exposure time (large
portions of your dark field image may be dark). You will have to manually increase
the exposure time by a few clicks but only experience will tell you the correct
number of clicks.
For all other images we recommend that you use the manual exposure mode.
Estimating the exposure time requires some experience, so until you have acquired
this expertise you should always record more than one micrograph at different
exposure times, and make a note (both mental and written) of the exposure times
that work best for a given type of image. For instance, for a zone axis diffraction
4.4 A typical microscope session 271
pattern on which you plan to perform measurements (indexing of the pattern) you
could use the following procedure:
r
place the sample in the proper orientation for the pattern that you wish to record;
r
under-focus the C2 lens (in diffraction mode) to obtain a more parallel incident beam and
therefore smaller diffraction spots;
r
reduce the C2 lens current until you can barely see the weakest diffraction spots on the
screen (make sure the room is completely dark, so that you have good night vision);
r
focus the diffraction spots (you may have to use the binocular to see the spots);
r
use the projector lens alignment to bring the transmitted beam to the center of the screen;
r
set the manual exposure time to somewhere in the range 22–45 s;
r
place the viewing screen cover over the screen and take a picture.
Most of the zone axis patterns shown in this book were recorded using this pro-
cedure. If diffuse features are present in the diffraction pattern (thermal diffuse
scattering, short-range order scattering, etc.), then you will probably have to use
either a longer exposure time, or increase the C2 current a bit. Again, it might be a
good idea to record multiple images with different C2 settings.
If you are about to record a convergent beam electron diffraction pattern, then
you can obviously not change the C2 current, since this would destroy the CBED
pattern (see Section 4.6.4). You will then have to record multiple images with
different exposure times to record all the image details present in the pattern. Weak
beam dark field images require very long exposure times, in the range of 22–90 s,
and again you will need to take multiple recordings.
Digitally acquired images have one significant advantage over conventional pho-
tographic images in that they are immediately available for inspection. If an image
is over-exposed, you can simply discard it, adjust the exposure time, and record
another one before saving it to disk. The best digital images are those that use the
entire available dynamic range of intensities (e.g., 0 to 2
N
− 1, with N = 12, 14,
or 16 for modern CCD cameras).
Photographic negatives must be developed and printed or digitized if they are to
be used for analysis or publication. The standard procedure for developing electron
micrographs is as follows (all steps to be carried out in a darkroom with only red-
filtered safelight present; latex or lint-free gloves should be worn whenever the
negatives or negative holders are manipulated):
r
remove the exposed negatives from the negative holders and place them in a metal or
plexiglass carrier;
r
place the carrier in the developer tank; develop for 3–5 min, depending on the type and
strength of the developer;
r
agitate the developer either manually or by means of nitrogen bursts once every 10 s or so;
r
remove the carrier from the developer and rinse in room-temperature running water for
90 s;
272 Getting started
r
place the carrier in the fixing bath and fix for 8–10 min, again depending on the type and
age of the fixing solution; use frequent agitation;
r
rinse in room-temperature running water for 20–30 min, apply a soapy solution to mini-
mize drying marks (optional), and dry in a warm and dust-free place.
The details of this procedure may vary depending on the type of chemicals and
negatives used. For nearly all micrographs reproduced in this book we used Kodak
Electron Image Film SO-163 with 2:1 diluted D19 developer.
If you plan to digitize your negative, you should use a good flatbed scanner with
a transparency adaptor, and scan the negative at a resolution of 1200 or 2400 dpi.
The grain size in the photographic emulsion is then about equal to the pixel size of
the digitized image. There is little point in using a higher resolution, unless you use
special film with a smaller grain size. Once you have a digital version of the image,
you can use the full power of image analysis programs to enhance the contrast,
scale the brightness linearly or non-linearly, select portions of the image, place a
micron bar on the image, and so on. If you alter the image in any non-standard way
(i.e. adding or removing information, enhancing features, etc.), then you should
explicitly state this in the figure caption (assuming that you are going to use the
figure in a report or paper).
4.5 Microscope calibration
As with any other scientific instrument, a transmission electron microscope must
be calibrated. The image magnification and diffraction camera length are perhaps
the most important calibrations for conventional TEM observations. In addition,
the relative orientation of the image and the corresponding diffraction pattern must
be calibrated. The following two subsections will describe briefly how these cali-
brations can be performed. It is likely that calibrations will have already been
carried out for the microscope(s) you are using, so it may not be necessary to repeat
them yourself. However, you should make sure that you understand the imaging
conditions used for the calibrations, so that you can reproduce them in case you
wish to make accurate measurements.
Calibrations must be carried out not only for conventional micrographs, but also
for digital and analog cameras. In all cases it is important to know the absolute
orientation of the camera/negative with respect to the column. For a negative it is
rather easy to find out how it is oriented inside the column (the emulsion side faces
the electron beam, and there is usually a fiducial marker along the side of the negative
which indicates its orientation in the camera). Calibration measurements should
always be carried out with the negative placed in the same orientation as it was
inside the microscope. Note that it is not sufficient to calibrate magnifications for
electron micrographs alone; if your microscope is equipped with a digital camera,
4.5 Microscope calibration 273
a magnification calibration must be carried out since the image plane of the camera
does not in general coincide with the image plane of the negative. There are several
other microscope parameters that may need to be calibrated. We will expand on the
topic of calibration in Chapter 10.
4.5.1 Magnification and camera length calibration
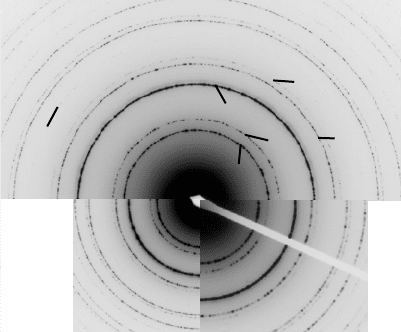
The diffraction camera length can be calibrated using a polycrystalline sample
of a known material; commonly used calibration samples consist of evaporated
aluminum or gold on a holey carbon grid. Figure 4.15 shows a diffraction pattern
for polycrystalline aluminum, obtained with the nominal camera lengths of 60, 80,
and 100 cm on a JEOL 2000EX microscope (the nominal camera length is what is
indicated on the microscope console). The first six ring diameters were measured
in two different ways: by hand using a ruler, and numerically, by first digitizing the
negatives at a resolution of 1200 dots per inch and then fitting a circle to each ring.
Example results from the second method are shown in Table 4.5. The measured
average values for L are close to the nominal values. The standard deviations are
simply based on the number of measured values. A more realistic standard deviation
would take into account the accuracy of the digital measurement, which is estimated
to be slightly better than 1%.
The orientation of the diffraction pattern with respect to the corresponding image
must also be calibrated. The most straightforward method involves the use of α-
MoO
3
, an orthorhombic oxide with lattice parameters a = 0.3963, b = 1.3856, and
111
200
220
311
222
400
λL = 100 cm
λL = 80 cmλL = 60 cm
Fig. 4.15. Calibration of the camera length of a 200 kV JEOL 2000EX microscope using
an evaporated aluminum film. The diffraction rings used for the calibration are indicated;
the (400) ring is just barely visible. The bottom quarters represent λL = 60 and 80 cm, and
the top corresponds to 100 cm.

274 Getting started
Table 4.5. Camera length calibration results for a
JEOL 2000EX microscope operated at 200 kV, using an
evaporated aluminum film. λ is measured in nm; L
is computed by dividing by the electron wavelength
λ = 0.002 508 nm.
(hkl) d
hkl
[nm] λL
60
λL
80
λL
100
111 0.234 1.537 2.004 2.493
200 0.202 1.531 1.989 2.484
220 0.143 1.529 1.994 2.487
311 0.122 1.524 1.994 2.487
222 0.117 1.528 1.995 2.494
400 0.101 1.528 1.983 2.491
λL 1.529 1.993 2.489
Standard deviation 0.004 0.007 0.004
L 60.96 79.46 99.24
c = 0.3697 nm, space group Pbnm.
†
This oxide grows in elongated platelet form,
with the normal to the platelet along the [010] direction, and the platelet length axis
along [001]. The [010] zone axis pattern is therefore rectangular, with the longest
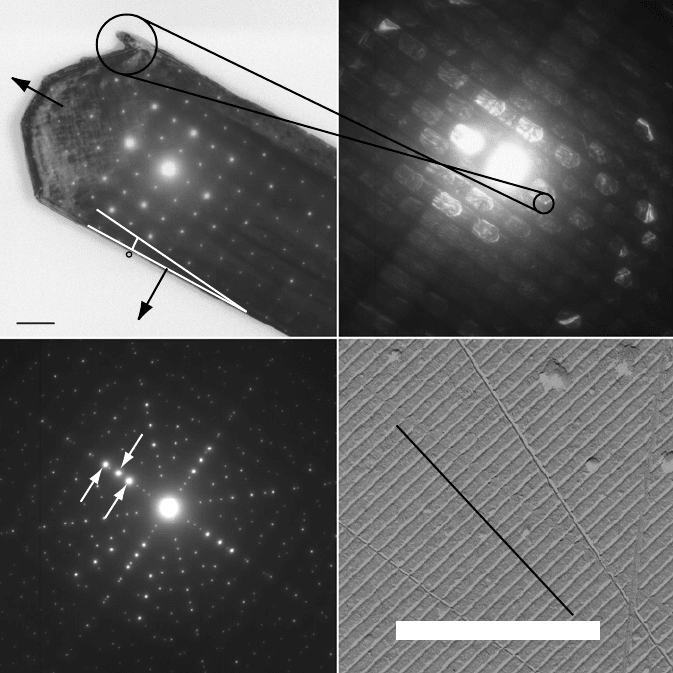
axis along [001]. Figure 4.16(a) shows a double exposure of a single platelet along
with its diffraction pattern. The 100 and 001 reflections are labeled. The longest
axis in reciprocal space corresponds to the length axis of the platelet, and the angle
between the two directions is measured to be nearly 6
◦
.
Since the diffraction pattern in Fig. 4.16(a) is symmetric, the angle between the
image and the diffraction pattern is either 6
◦
or 186
◦
. We can determine which of
the two angles is the correct one by defocusing the diffraction pattern (decrease the
current through the diffraction lens, so that its focal length increases). The resulting
image is shown in Fig. 4.16(b); a dark field image of the platelet is visible in each
diffraction spot. The orientation of the platelet is clearly rotated by 180
◦
, as can
be seen by comparing the circled regions in Figs 4.16(a) and (b). The diffraction
pattern can be brought into the proper orientation with respect to the image by a
counterclockwise rotation of 186
◦
.
When the camera length is changed the diffraction pattern may also rotate around
the origin. To determine whether or not this rotation is present we can simply
obtain a multiple exposure of the diffraction pattern at different camera lengths, as
shown in Fig. 4.16(c). Between exposures the diffraction pattern was re-centered
using the projector lens shift controls. It is clear that there is no rotation between
†
This is not a standard space group setting. The International Tables give the setting Pnma, which can be obtained
from Pbnm by cyclic permutation of the unit cell axes.
4.5 Microscope calibration 275
200nm
(a) (b)
(c) (d)
5.8
[100]
100
001
[001]
60
80
100
20 lines = 4.57 cm = 9.26 µm
Fig. 4.16. (a) Double-exposure micrograph of an α-MoO
3
platelet and its diffraction pattern;
(b) defocused diffraction pattern showing a dark field image of the platelet in each reflection;
(c) multiple exposure diffraction pattern of [010] α-MoO
3
reveals no rotation between
different camera lengths; (d) image at 5000× (indicated on the microscope console) of
a 2160 lines per millimeter calibration grating. All images obtained on a JEOL 2000EX
microscope.
different camera lengths for this particular microscope (JEOL 2000EX). For other
microscopes there may be a significant rotation, which can simply be measured
from the multiple exposure diffraction pattern.
Calibration gratings for magnification calibration (image mode) are available
from many of the microscopy supply companies (listed on the
website). Typically
a calibration grid with around 2000 lines per millimeter should be sufficient to
calibrate all but the highest magnifications. It is important that the sample should
be at the eucentric position throughout all calibration steps. For all microscope
magnifications record a bright field image of the calibration grid. After developing
276 Getting started
the micrographs, use a ruler to measure the distance between two grid lines on
opposite sides of the micrograph and divide by the number of lines in between
them. You should perform this measurement a couple of times for each micrograph
and take the average of all measurements. Figure 4.16(d) shows a typical image
for the magnification 5000× for a JEOL 2000EX microscope, operated at 200 kV.
The calibration grid has 2160 lines per mm, so that the spacing per grid line is
equal to d = 463 nm. Twenty lines correspond to a measured distance of 45.7mm
(Fig. 4.16d), which should also be equal to 20d = 9260 nm. The magnification is
therefore equal to 45.7 × 10
6
/9260 = 4935, close to the 5000× indicated on the
microscope console. If you make multiple measurements for each micrograph then
you can compute error bars for the measured magnifications.
For the highest magnifications, only a single grid line will be visible on the
micrograph. Measure the distance between two easily recognizable features, and
compare it with the same distance at the largest magnification for which two grid
lines are present. The ratio between those two distances can then be used as a
multiplicative factor to compute the actual magnification. Typically, magnifications
above about 60k× are obtained in that way. For the highest magnifications (about
200k× and above) it is customary to use lattice fringes with a known spacing.
If you are going to publish micrographs, then you will need to convert the cal-
ibrated magnifications to “micron bars”. If your images are conventional micro-
graphs on photographic negatives, you will need to know how many millimeters
in the image correspond to a typical distance on the object (1
µm, 10 µm, etc.). If
you digitized your micrograph, or the image was digitally acquired, then a more
convenient parameter may be the number of pixels per unit image length. We leave
it to the reader to derive the appropriate conversion relations.
4.5.2 Image rotation
In many older microscopes, the image rotates around the optical axis as the magni-
fication is changed. This is due to the Lorentz force on the electrons, which causes
a helical path around the optical axis, as described in Chapter 3. Modern micro-
scopes may have an additional lens in the magnification stage, so that this image
rotation is minimized or, ideally, eliminated. For such machines, the image does
not rotate when the magnification is changed, and the diffraction pattern is in the
correct relative orientation with respect to the image.
If the image does rotate, then we must calibrate the rotation angles as a function
of magnification. First of all, we must determine the relation between the physical
orientation of the primary tilt axis and the projected orientation of this axis. This
can be done in the following way: lower the sample using the z-control so that the
sample holder is near its lowest point. Adjust the image focus and bring a feature
4.6 Basic CTEM observations 277
to the center of the screen. Then tilt the sample along the primary tilt axis by a
positive rotation angle until this feature is a few centimeters away from the center.
Record a double-exposure micrograph of these two images (i.e. with the feature at
the center and tilted away). The line connecting the two images of this feature on the
micrograph is normal to the primary tilt axis. Since the tilt angle was positive, the
direction of the image shift also indicates the absolute orientation of the primary
tilt axis with respect to the negative.
This procedure is illustrated in Fig. 4.17: the first image on the top left shows a
double exposure of the calibration line grid at a nominal magnification of 8200×.
The image was acquired using a Gatan DualView camera on a Philips EM420
microscope operated at 120 kV. The arrowed feature moved from right to left for a
positive (counterclockwise) rotation around the primary tilt axis. The tilt axis is then
oriented at right angles to the line connecting two identical features in the double-
exposure image. The image rotation at other magnifications (two representative
ones are shown in Fig. 4.17) can then be measured with respect to the tilt axis.
At the highest magnifications only a single grid line may be visible in the image,
making it difficult to obtain an accurate measure of the image rotation.
It is convenient to represent rotation data in graphical form. The drawing in the
lower half of Fig. 4.17 represents the orientations of the bottom edge of the image
with respect to the primary tilt axis. The orientation of three diffraction patterns
(different camera lengths) are also added to the figure. They were measured using
the double-exposure technique shown in Fig. 4.16(a). We will use this graphical
calibration chart later on, when we describe how to determine the orientation of
a crystal with respect to the microscope column. Regardless of the type of mi-
croscope you use, it is important to understand the relative orientation of tilt axes
and images/diffraction patterns. We encourage the reader to perform a series of
calibration measurements similar to that described in this chapter.
4.6 Basic CTEM observations
Now we are finally ready to start some basic TEM observations. In the following
sections we will describe typical image and diffraction features that are easily
observed in the four study materials. We will emphasize those features that are
common to all four, and which therefore appear to be relatively independent of the
particular details of the crystal structure. We will discuss basic imaging techniques,
and illustrate how information from a zone axis electron diffraction pattern can be
transposed onto a stereographic projection.
The images shown in the following sections are easy to obtain, and we encourage
the reader to spend time on the microscope with one or more of the study materials.
You should feel free to experiment with the microscope (within reasonable limits